Friday, April 29

from tile to ???

In my previous post, i had a picture of a couple of these cute little things, promising to show you something fun i thought up. Well I'll give you a hint....


1) They go on tables
2) You can sit your sweet (herbal/caffeine free) tea or hot chocolate on them
3) They are COASTERS!


Okay, maybe i gave it away
---------


When we moved into our house last year, the seller left a really nice, expensive (albeit very "cabin-ish") dining table and chairs. And although it wasn't exactly to our taste, or decor, to keep it in good condition we needed some coasters so we didn't get ring stains. I looked EVERYWHERE for some cute coasters that weren't too expensive. My friend and I were at home depot and came across these tiles!


9 for about 4 bucks!

Well I didn't like the natural grey color so after a lot of different color decisions, Justun (the husband) picked out this nice light brown tannish color. FOR 2 BUCKS!


They have these sample containers all ready-made and they cap is a brush when you unscrew it! PERFECT! (FYI, one container covers 9 square feet)


I painted all of my tiles with 2 coats each

Be very careful, i don't know if one had a crack or I am just a klutz or what but it broke so I was down to 8.


----------------
After i painted them, they looked great, but were just plain boring brown. I had some leftover black vinyl from a Halloween project last year, and decided I would add some kick -A design. You could go the hard way and cut it yourself using scissors or an exacto knife OR you could become best friends with someone who owns a Cricut! I chose the latter. -- By the way, we were friends BEFORE she got the Cricut. No, i am not using her! We really are best friends!


I couldn't choose just 1 design, so I opted for 2

cute damask design


"M" for our last name

-------------

After we cut the designs out, I applied them on top of the painted tile.


Then I applied 3 coats of modge-podge (let it dry between coats) This gives it a nice smooth clear finish


VIOLA! All finished!

----------------------------------


The breakdown:


tiles = 4 bucks


brown paint = 2 bucks


vinyl = I had some laying around but initially it was 10 bucks, i only used half so really 5 bucks


modge-podge= 8 bucks but I used only 1 buck worth and can save the rest


TOTAL= 12 bucks


Divide that by 8 and it's only 1.50/tile. Not too bad for something you love!


I know the numbers aren't exact, but the key is always to try to make it as cute as you can, by making it as inexpensive as possible. The best way i can do this is by using what I have.


The only things I didn't have were the tile and the paint so this time I only really spent 6 dollars and i really love the coasters and was able to make them my own!


I'm still trying to find a cute way to display them so until then, here they are!

Monday, April 25

UP TO MY EARS!

Just wanted to inform my loyal readers (do i even have loyal readers?!) that i have LOTS of things in the making and I am almost done with all of them so there will be blog updates very soon! Just like everyone else, i have a baby and also work a full time job so life gets busy! Plus the hubs and I took advantage of this past Saturday and got some spring cleaning in and some house projects finished. What's a girl to do?!


To keep you a little entertained and guessing, you can look forward to something cool from these cute little things .... any wild guesses?! There are more than just two, by the way!


Saturday, April 16

Bed - before and after!

(nap time means craft time!)

In my ripe old age of 26, I've refurnished several pieces of furniture. A kitchen table, a side table, a few mirrors, etc... but i have always just painted them one color and wondered why they looked so plain! Well, I've figured it out! Say hello to GLAZING!

Back in February, I got this everyday run-of-the-mill brown headboard for FREE. My grandma bought a house that was fully furnished, and lucky for my sister and me, she shared her treasures with us! Well here it is, exactly as we found it.


Well, right away i knew the brown HAD TO GO! We were not living in the 80's. What to do with it though? paint it, of course! My husband got me a sander a while back, but a sander wasn't going to work with all of these edges, so I opted for some spray primer and spray paint. It didn't take me long to know I wanted it bright white!

Here's what I chose


This is the result after the primer and paint. lots better huh!!! I was a little nervous but knew for the first time I was deciding NOT to end it here! I was reading allthingsthrifty.blogspot.com and saw glazing and knew I HAD to do it. That headboard needed brought back to life!


I headed straight to Home Depot knowing exactly what I needed- glaze tinted with black paint. Well much to my unpleasant surprise, they WILL NOT tint it for you. You have to do it yourself. I left with a pint of glaze, a sample of black paint, a stir stick, and nervousness mixed with excitement!


To mix it yourself you need:

1 part paint to 4 parts glaze


I used 1/4 cup paint to 1 cup glaze, but then added a little more paint because I wanted it EXTRA dark.


I was a little nervous I would ruin it, but I'll be darned if it was going to stop me from tryin'!

I just used a paintbrush, and worked a section at a time brushing on the glaze/paint mixture, and rubbing if off. You'll probably need several small pieces of rags. I used parts of an old Jersey bed sheet we didn't use anymore, it worked great!


There are 2 steps to glazing:

1) brush on

2) wipe off


It's that easy! The result is splendid!

*

*

*

*

This is my guestroom (It's a work in progress)


I'm so happy with how it turned out and now I am scavenging my house looking for things to glaze!
~~~~~~~~~~~~~~~~~~~~~~~~~
The breakdown


Bed: FREE

Primer/paint: 7 dollars

Faux glaze: 13 dollars

black paint: 3 dollars

paintbrush: already had one

TOTAL: 23 dollars

AND I still have plenty of paint and glaze leftover for the next project (stay tuned for that!)


I don't think I could EVER find a pre-painted headboard that I loved for that price. Even if you had to buy a used for 10-20 bucks, it would still be cheaper, and in my opinion better because you get to choose your own colors!


Here's a how-to video that I made, in case you want to try your hand at glazing! It includes some good tips! (Please don't look at my garage! That's a different project for a different day!)


Wednesday, April 13

Extreme Couponers! (I am so jealous!)

Want to coupon better?! So do I! I seem to do okay, but there HAS GOT to be a way to do better. I'm convinced southern states have the best grocery stores.


Utah has THE WORST couponing Ive ever seen! None of our stores that I have shopped at have double coupon days, only one store lets you "stack coupons" with their coupons and they have to mail you the coupons (which I've yet to see any in the mail) and only Wal-Mart lets you compare prices with an ad, and they NEVER put stuff on sale. DUMB! Plus I swear stores out here purposefully do not put the items on sale that have manufacturer coupons out, this saving you nothing!


Well lucky us, TLC has a new show out! EXTREME COUPONING!!!!

I'm really hoping one of these women is from Utah and help me save even more than i i know how to now!

Check out this link for some great ideas and videos on how to become an "extreme couponer".


http://tlc.howstuffworks.com/tv/extreme-couponing


And don't forget to tune in tonight to their show!


***p.s. did you know that SAM'S CLUB and COSTCO take coupons?! It's true. I do it all the time.

Monday, April 11

What do a book, a Tide box, and a frame all have in common?!

This!


Cute framed paper roses PERFECT for my "Casablanca" guest room!


Wanna make your own?! Here's how!


First you need a paperback book. Any ole one will do. I used one called "The Life and Times of Einstein" or something like that. Sorry Albert! For 25 cents at a secondhand store, I couldnt pass it up! You'll want to cut off the binding, or if your book is as old as mine was, the pages will sort of just peel right off the glue, like this....


Next you will want to take 1 page and fold it in half


Then you'll cut a circle (or as close to a circle as you can -egg shaped is fine) trying to use as much of the paper as possible. The circles WILL NOT be connected, but you'll want to hold them together.


Next, you need to cut a spiral shape, all the way to the middle. I always started at the bottom and worked my way around. Don't worry about what the very middle looks like, you'll just be cutting that part off anyway!


After it's cut (still try to keep the pieces together), start rolling from the outside, toward the middle, like this. Roll as tight as you can for about the first 5 or 6 rolls. Make certain that the bottom is smaller than the top, like this picture. The bottom (the smaller part) will be the bottom of your flower, and the top (the larger part), the top of the flower. Make sense? This might take you several times of practice but after a few times, you will be able to roll them in your sleep!
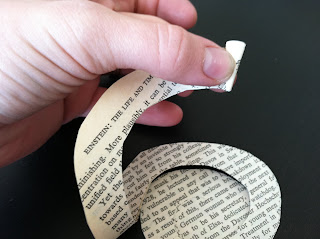


After that, just keep rolling, almost until the end. It should look something like this by the time you are almost done. If the edges start to flare out, its fine! It's just making the "petals" more lose, which makes a bigger rose.


When you get to about this point, it will begin to be difficult to roll. Just cut off the rest, like so...


This is what is should look like!


Now you are almost done! Just let go, and here is your paper rose! If its still a little too tight for your likin, you can just loosen it up with your fingers, or cup it in your hands and shake a little bit.


Now, after several minutes (or hours, or days!) you will have LOTS of delicate paper roses!


Now all you need is a frame. Find your favorite one, and don't worry about the color. You can just spray paint it like i did! This one cost me about 2 bucks at the DI (Utahs version of Goodwill) We struck gold the other day when we found about 10 cans of spray paint in our garage from the previous owners of our home, so i threw on a coat of red and viola! Here is the before picture...


After it dried, i needed a backing to put my roses on. My frame came without anything so I had to think quick. That's where the tide came in! I had very little powder left in the box, so i set it aside, and cut the size I needed for the inside of the frame. Not only did I make the perfect fit, it smelled wonderful! If your frame has glass or cardboard in it, then you're all set. If not, just look around your home and find something that you can cut to size. I hot glued the cardboard in, then one by one, glued in my roses! It was a lot of fun and VERY CHEAP!


The breakdown...


The book: 25 cents

The frame: 2 dollars

The spray paint: FREE!

The cardboard: FREE!

Gluesticks: 2 dollars.

TOTAL! ... $4.25!


~~~~~~~~~~~~~~~~~~~~~~~~~~~


Something like this at Pier 1 or the mall would cost you WAY more than that, AND this way you can personalize it to your liking!


Who said you cant decorate for cheap?!


I was inspired by my friend Laura at work, who found a wreath made of the same roses when we were craft blog stalking last month! She has WAY more patience than I do, and made the wreath. Cute huh?! She's got more cute plans to hang this bad boy! The possibilities for the roses are endless!


***************


Sunday, April 10

getting to know you! err... me!

okay so I think my problem was that I am on a Mac. And it's huge. So not only am I not dealing with "windows", the actual window that I am on is so big, that it's throwing things off. I am going to pray to the heavens that whomever is reading this, does not see a huge black bar at the top. If you do, please tell me! Also, please help me figure out how to make it disappear...

So, moving right along.... A little bit about me. I probably don't have enough time to blog, but I'm going to. And hopefully often. And probably while I'm at work. Don't worry, I get my work done! You will be relieved to know that I have not always "pinched my pennies". I was a paycheck to paycheck kinda gal up until I met my husband. Well actually up until we tied the knot, and even then I was reluctant to learn new ways. We got married in Tennessee where I lived, then on our way out to Utah, we stopped in at a bank in Illinois that I had previously used, to close my account and collect what I thought would be several hundred dollars that had been earning interest, only to find out that a certain un-named gym (Murfreesboro Athletic Club) had been pulling out monthly instalments for a membership that I had been guaranteed ended 5 months back. As you can guess, we left owing about 300 hundred dollars in overdraft charges, thus handing over ALL of the cash that we had gotten in our pretty Hallmark wedding cards. After crying over it for several minutes, I wiped my tears and put on my hindsight 20/20 glasses and figured I could learn a few things about saving.


After 4 years of marriage and lessons from a money nazi (or so I thought for the first few of our hitched years) I am confident when i say I am now an avid wallet watcher who still enjoys crafting, eating, being the mommy, and wifey-ing it up!


And for a little bit of trivia... my husband and I have lived in 4 different apartments, bought 3 cars, paid for 2 years of college, and purchased our 1st house AND neither one of us has had a credit card. EVER. Not even to Target or ANYTHING! And we still dont. That's something to be proud of I reckon.


I used to be a little peeved at the hubs when I couldn't buy certain things I wanted, but now I'm grateful for it every day.
AGH! My first post is that I cannot figure out how to get the heading on my blog right! In fact, I cannot figure out how to get any of it right! I configure the layout and the colors, cross my t's and dot my i's, and line up all my ducks, but once I hit save, it WILL NOT CHANGE! You will soon find, that although I am considered IT at work, and I fix other peoples' mistakes on our programs, I am by no means, computer savvy. Now, off to see if I can get this thing all prettied up so youre not readin' in black and white.

Welcome ya'll!